The Ultimate Guide to Transferring Universities Without Losing Credits in 2026
It happens more often than you think. Maybe you chose a school that was too far from home. Maybe your major changed and another university has a much better program. Or maybe the vibe just wasn't what you expected during freshman year. Whatever the reason, you've decided to transfer.
But then the fear kicks in. You start thinking about all those late nights in the library and the thousands of dollars you spent on tuition. Will my credits actually count at the new school? Am I going to have to retake Intro to Psychology for the third time?
Here's the deal: in 2026, transferring universities is a completely normal and strategic move. Roughly one in three students in Canada and the US will transfer at least once during their undergrad. But it requires a level of organization that most students completely overlook. If you do it wrong, you could lose a full semester of work. If you do it right, you can level up your education without missing a single beat.
Real talk: this is a project management task. You're the manager, and your credits are your currency. Don't lose a cent of them.
Here's your full, step-by-step blueprint.

Step 1: Run a Brutally Honest "Stay or Go" Audit
Before you fill out a single application, you need to be clear on your "why." Transferring is a massive energy sink. It takes months of paperwork, emotional energy, and real money. You should only do it if the destination genuinely offers something your current school can't.
Start by writing out two columns: what you're running away from, and what you're running toward. The students who regret transferring are almost always running away from something they didn't actually address. The students who thrive after transferring are running toward a specific program, city, or opportunity.
Ask yourself these questions before you do anything else:
- Is my dissatisfaction about academics, or is it about social life and fitting in?
- Does the new school rank significantly better in my specific field, or just overall?
- Have I actually talked to a transfer advisor at my current school?
- Am I willing to potentially add one semester to my degree timeline?
If you've answered these honestly and you still want to transfer, great. Let's get moving.
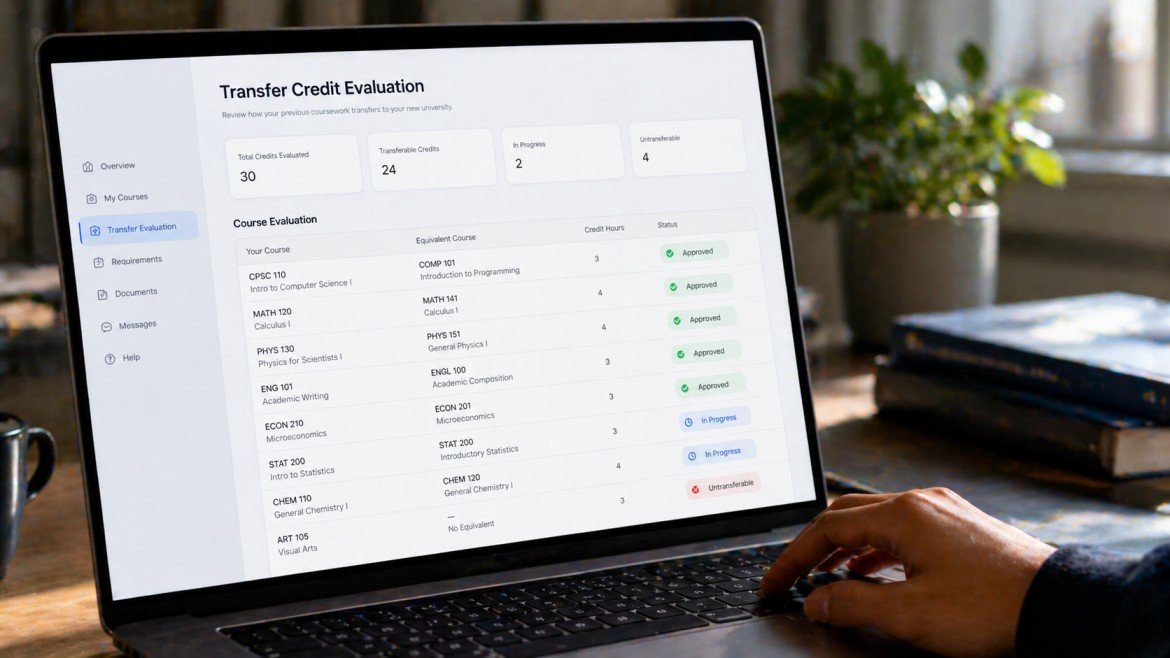
Step 2: Decode the Transfer Credit Equivalency System
This is the most technical part of the whole process, and it's where most students get confused. Every university has a different naming convention for its courses. "English 101" at your current school might be listed as "Composition and Rhetoric 1000" at the new one. They're the same course, but the codes don't match, and that's where credits get lost.
The goal is to find a "one-to-one match" for each of your completed courses. Most major universities in Canada and the US now have online Transfer Equivalency databases or portals. Here's how to use them:
- Pull up your current unofficial transcript from your school's student portal.
- Go to the admissions or registrar page of your target university and search for "transfer equivalency" or "transfer credit database."
- Enter each of your completed courses one by one and see how they map.
Schools like the University of Toronto, UBC, University of Waterloo, and most major US state schools have these tools publicly available online. Use them before you apply. This tells you exactly what you're walking into.
The Golden Rule of Equivalency: If a course doesn't have a direct match, it usually becomes a generic "Elective Credit." This is better than having it rejected outright, but it won't help you finish your major requirements any faster. You want your credits to count toward core program requirements, not just as filler.

Step 3: Build Your Academic Paper Trail (Your Syllabi Are Gold)
Here's the insider move that most students don't know about: if the admissions office tells you a credit won't transfer, you don't have to just accept it. Registrars are often making decisions based purely on course titles and codes. They're not reading what you actually learned.
Your weapon? Your course syllabi.
A syllabus proves what was actually covered in a class. It shows the textbooks, the weekly topics, the grading rubric, and the rigor of the material. If a new school says "your Calculus II class isn't equivalent to ours," you can pull out your syllabus and prove the content was identical, or even more advanced.
Here's what you need to do right now, even before you apply anywhere:
- Log into your current university's learning management system (Canvas, Blackboard, Moodle, etc.)
- Download the syllabus for every single course you've completed
- Save them in a clearly labeled Notion folder or Google Drive folder organized by semester
- Also save any standout assignments, lab reports, or papers that demonstrate what you learned
In 2026, having a digital academic archive is not optional. It's a competitive advantage. When you sit down with a department head at your new school and you can instantly pull up a 12-week syllabus proving your Chemistry course was legitimate, you're going to win that appeal.

Step 4: Build a Strong Transfer Application
Transfer applications are fundamentally different from freshman applications. Nobody cares about your high school robotics team anymore. What they care about is your university GPA and your ability to prove you can handle their program.
Here's what a strong transfer application needs in 2026:
A university GPA of 2.5 or higher. Most schools require at minimum a 2.0, but if you want real scholarship money, aim for 3.0 and above. The higher your GPA, the more negotiating power you have on financial aid.
A compelling personal statement. Don't write a generic "I want to grow as a person" essay. Write specifically about why this school's program is the logical next step for your career. Reference specific professors, specific courses, or specific research happening at that school. Show that you've done your homework.
Strong letters of recommendation. Ask a professor who actually knows your work, not just a TA. Give them at least three to four weeks notice and provide them with a brief note about what you're applying for and why.
A financial aid appeal letter. This is optional but powerful. Many universities have transfer-specific scholarships that go unclaimed every year because students don't ask. Write a short letter explaining your situation and asking directly what transfer scholarships are available.

Step 5: Request Your Official Transcripts Early
This step sounds obvious, but it trips up a shocking number of transfer students: official transcripts take time, and deadlines wait for no one.
Here's the timeline you need to follow:
- At least eight weeks before the application deadline, request your official transcripts from your current registrar's office
- Pay any fees required (typically $10 to $25 per transcript)
- Confirm whether the new school wants them sent digitally or by mail
- Track the request and follow up if you haven't received confirmation within two weeks
Some schools require mid-year transcripts as well, showing your grades from the current semester even before it's finished. Check the specific requirements for every school on your list.
One more thing: if you're applying to multiple schools, you'll need separate official transcripts for each one. Order them all at the same time. Don't stagger this.

Step 6: Master the Credit Evaluation Appeal Process
This is the step where students leave real money on the table by being too shy to speak up.
Once you're accepted and you submit your transcripts, the new school will send you a "Credit Evaluation Report." This document lists every course you've taken and tells you how it transfers: accepted, accepted as elective, or not accepted.
If you see a course listed as "Not Accepted" or bumped down to a generic elective, you have the right to appeal. Here's the exact process:
- Identify which department is responsible for the equivalent course at the new school.
- Email the department's undergraduate coordinator and ask for a brief meeting to discuss credit recognition.
- Bring your syllabus, a copy of your transcript showing your grade, and one or two examples of your best work from that class.
- Ask politely but directly: "What would I need to demonstrate to have this course recognized for equivalency?"
Often, a five-minute conversation with an actual professor is all it takes to get a credit approved. Professors care about what you actually learned. Registrars work within a system of codes. Go over the registrar's head, respectfully, and you'll often win.

Step 7: Map Out Your New Graduation Timeline
Once you know exactly which credits are moving with you, it's time to build your new roadmap. This is not optional. If you skip this step, you'll end up in your third year realizing you're missing a prerequisite that was supposed to be completed in first year.
Here's how to build your transfer graduation map:
- Get a copy of the new program's full degree requirements (usually called a "program guide" or "academic calendar")
- Highlight every requirement you've already satisfied with transferred credits
- Identify any gaps, especially in prerequisites for upper-year courses
- Build a semester-by-semester course plan from now until graduation
Does the transfer add a semester to your degree? If so, is the move worth it? Run the numbers honestly. An extra semester costs roughly $5,000 to $15,000 depending on the school. If the new program opens significantly better career doors, that might be a solid investment. If you're transferring for lifestyle reasons, it's worth thinking hard about whether the cost is justified.
Use a Notion template or a simple spreadsheet to track this visually. Seeing the finish line clearly is what keeps you motivated when the transfer process gets overwhelming.

Step 8: Sort Out Your Financial Aid and Scholarships
This is a step that students consistently forget until it's too late, and it can seriously derail you.
Your current financial aid package does not automatically transfer. You need to re-apply for everything at the new school. This means:
- Submitting a new FAFSA (US students) or a new OSAP application (Ontario students) with your new school's information
- Applying for the new school's institutional grants and bursaries separately
- Searching specifically for "transfer student scholarships" because many schools have dedicated pools of money for transfer students that never get fully used
In Canada, provincial student loans follow you to the new school as long as it's an eligible institution, but you need to notify your provincial government of the school change in writing. Don't assume this happens automatically.
Also check whether your current school has an exit bursary or refund policy. If you're leaving mid-year, some schools will refund a portion of your tuition depending on when you officially withdraw.

Step 9: Plan Your Housing and Campus Life
Academics are sorted. Now let's talk about the part that will actually determine whether you're happy at the new school: your physical environment and social life.
Here's what you need to figure out at least two months before you start:
Housing. Does the new school guarantee housing for transfer students? Many don't. Check the transfer student housing portal early, because transfer-year housing often fills up faster than freshman housing. Have a backup plan (off-campus apartments, sublet groups on Facebook or Reddit) ready before you need it.
Orientation. Most schools have a separate orientation for transfer students, usually a one or two-day event before the semester starts. Go. It's not optional. This is where you meet people in the exact same situation as you, and those early friendships are what get you through the adjustment period.
Campus resources. Find the Writing Centre, the Academic Advising office, the Transfer Student Association (yes, most schools have one), and the food bank or emergency bursary office. Know where these are before you need them.

Step 10: Prepare for Transfer Shock (and Beat It)
Here's something no admissions brochure will tell you: transfer shock is real.
Transfer shock is a well-documented phenomenon where a student's GPA drops noticeably in their first semester at a new school, even if they were a strong student at their previous institution. It happens for completely understandable reasons. You're adjusting to new grading styles, new professor expectations, a new campus layout, and a new social environment all at the same time. That's a lot.
The students who beat transfer shock fastest are the ones who build community immediately. Don't wait until you feel settled. Join things before you feel ready.
Here's a practical plan for your first two weeks:
- Attend at least two club or society info events, even for things you're only slightly curious about
- Introduce yourself to at least one person in each of your classes in the first week
- Visit your academic advisor before midterms, not during them
- Find one study spot you love and make it yours
- If your school has a Transfer Student Association, show up to the first event
The social side of transferring is genuinely harder than the paperwork. Give yourself permission to feel awkward for a bit. It passes faster than you think.
The Quick-Reference Transfer Checklist
Here's everything in one place. Screenshot this.
- Complete your "stay or go" audit before you apply anywhere
- Use the new school's online transfer equivalency tool for every course on your transcript
- Download and save syllabi for every course you've completed
- Order official transcripts at least eight weeks before application deadlines
- Write a specific, program-focused personal statement
- Apply for transfer-specific scholarships at every school you apply to
- Review your credit evaluation report carefully and appeal any rejections
- Re-apply for financial aid (FAFSA or OSAP) with your new school's information
- Sort out housing at least two months before your start date
- Attend transfer orientation and join at least one student group immediately
Final Word: Your Credits Are Worth Fighting For
Transferring is a bold move. It takes courage to admit that something isn't working and make a change. But the students who come out on top are the ones who treat this process like a job, stay organized, and advocate for themselves at every step.
Your credits represent real time and real money. They're yours. Don't let an outdated database or an overwhelmed registrar take them from you without a fight.
You've got the blueprint. Now go use it.
Want more real advice on navigating university life? Subscribe to the Undergrad Vibes newsletter for weekly tips on academics, campus life, and making the most of your undergrad years.